
Destiny 2 Insurrection Prime Guide: Boss Kill, Mechanics and Cheese
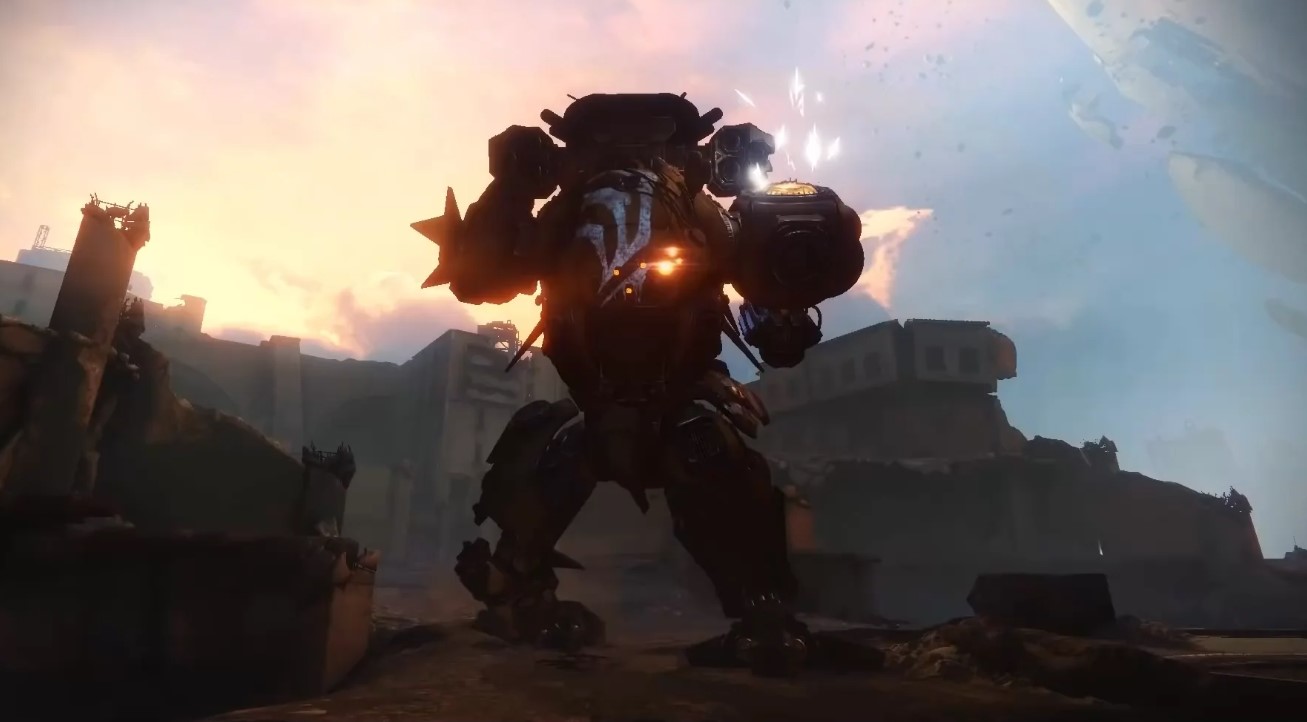
Insurrection Prime Revolutionary is the capstone activity of Pantheon 2.0, released 9 June 2026 with the Monument of Triumph patch. It is not a single-boss queue: it is a 7-encounter gauntlet that strings together every boss from the prior Pantheon 2.0 launch blocks and adds Insurrection Prime, the Prime Servitor mech from the vaulted Scourge of the Past raid, as the brand-new 7th and final boss. 6 players, no matchmaking, every Guardian under-leveled, three difficulty tiers.
Before reaching Insurrection Prime, this activity sends you through the six bosses covered in our Calus Resplendent guide and our Morgeth Surpassing guide . This guide stays focused on the Insurrection Prime boss fight itself: the Berserker batteries, the underground CAP buff collection, the tactical map, the shield panels, the Drake Tank trigger and the CAP triangle DPS formation. For the wider patch context see our Pantheon 2.0 overview and the Monument of Triumph guide .
Key Takeaways
- 7-encounter capstone: Argos, Gahlran, Calus, Warpriest, Consecrated Mind, Morgeth, then Insurrection Prime. Sibling guides cover the first six.
- Six players, no matchmaking: bring a fireteam, use LFG, or grab a carry. Standard pools revives across the full gauntlet.
- Double-encounter boss: Berserker battery setup and the boss kill are one uninterrupted phase. No checkpoint between setup and DPS.
- CAP mechanic is the skill floor: Continuous, Angular and Parallel buffs collected underground, then arranged in a damage-phase triangle. Touching a different-buff teammate tethers and kills both.
- Cheese exists: a Titan Ward of Dawn plus Heavy Combat Bow exploit currently launches Insurrection Prime into a kill barrier. Working at launch, expected to be patched, harder than a clean clear.
- Unique drops: community clears document the Anarchy catalyst and Threat Level shotgun as possible drops from this encounter.
What Is Insurrection Prime Revolutionary
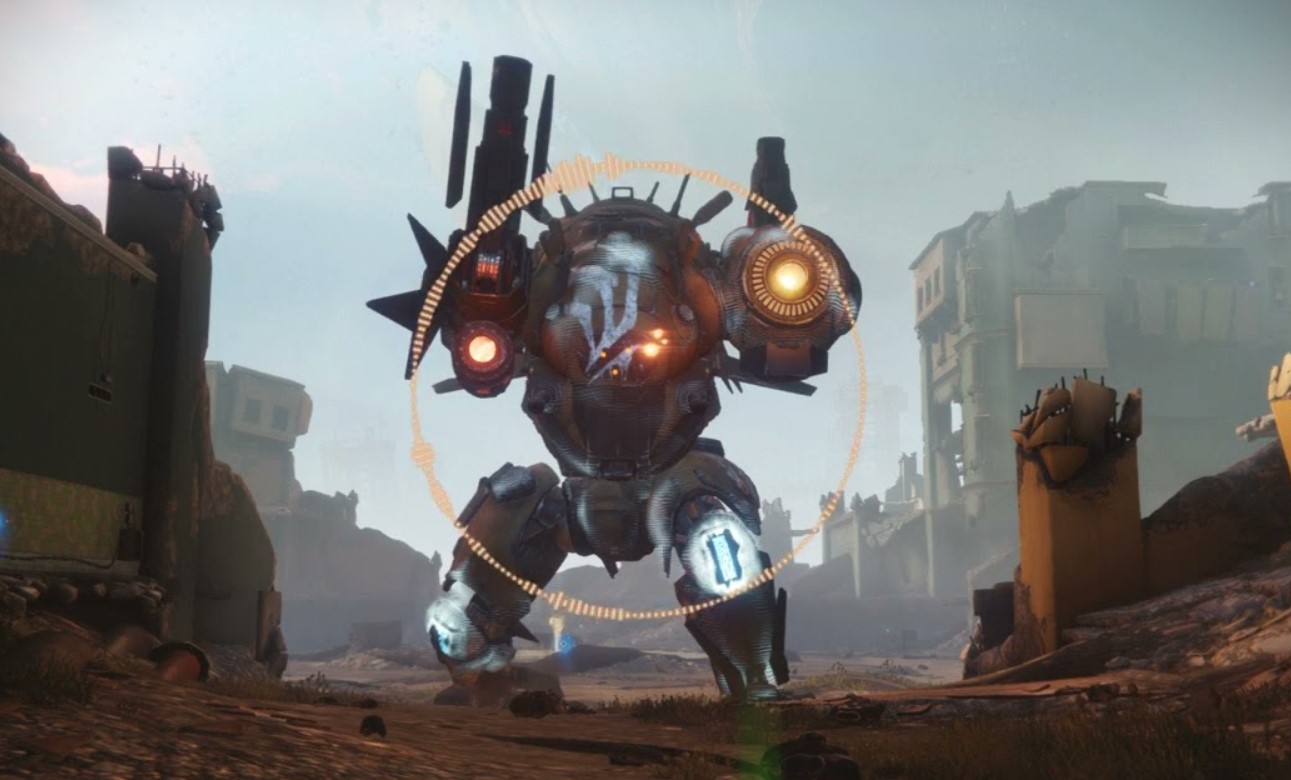
Insurrection Prime Revolutionary is the capstone of Pantheon 2.0, sitting alongside Calus Resplendent and Morgeth Surpassing in the Raids tab under Destinations. Mechanically it is the densest activity in the playlist: a 7-encounter gauntlet that ends on a brand-new boss fight with its own load-bearing mechanics. The boss is Insurrection Prime, the Prime Servitor mech from Scourge of the Past, heavily reworked for Pantheon 2.0.
Place in Pantheon 2.0 as the 7-Encounter Capstone
Multiple sources confirm the same activity layout. Before reaching Insurrection Prime you fight every prior Pantheon 2.0 boss in a single continuous run. Revives are pooled across the whole gauntlet on Standard, which means a sloppy first three encounters can leave you light by the time the new boss spawns. Plan to clear the prior 6 bosses cleanly before you bank on the back end.
The Six Prior Bosses and Sibling Guide Links
The six bosses you fight before Insurrection Prime are the same encounters that anchor the sibling launch activities. For full deep-dive walkthroughs, use the dedicated guides. For Argos, Gahlran and Calus see our Calus Resplendent guide . For Warpriest, Consecrated Mind and Morgeth see our Morgeth Surpassing guide . Both guides include role splits, callouts and per-encounter loadouts that work identically inside this capstone.
Activity Format and Difficulty Tiers
All Guardians are under-leveled by design and the boss fight demands coordinated comms. Three difficulty tiers are available the moment the activity unlocks. The tier you pick decides whether you are learning, farming or pushing for Platinum.
| Tier | Revives | Power Handicap | Feats | Reward Tier |
| Adventure | Infinite | Light | Off | Loot still drops, no Platinum |
| Standard | Limited, pooled | Medium | Off | Weekly Adept, Pantheon armor |
| Custom | Limited, pooled | +5 to +20 stacked | On | Masterwork loot, Platinum emblem |
Standard is the right tier once your team has cleared Calus Resplendent and Morgeth Surpassing on Standard. Adventure is the place to learn the Insurrection Prime CAP formation without losing revives. Do not jump straight to Custom on a first clear of the capstone. The Feats stack on top of an already-dense mechanic load.
Team Setup, Rewards and Time Estimates
This is a 7-encounter activity, so your fireteam composition has to carry from the first boss of the run all the way to the Insurrection Prime DPS formation. Most teams burn revives on Warpriest or Calus inside the gauntlet and then arrive at Insurrection Prime under-prepared. The quick-stats reference below is your at-a-glance baseline for every loadout and tier decision later in this guide.
| Spec | Value |
| Activity | Insurrection Prime Revolutionary (Pantheon 2.0 capstone) |
| Encounters | 7 (six prior bosses + Insurrection Prime as the final) |
| Final boss | Insurrection Prime, Prime Servitor (Scourge of the Past) |
| Players | 6, no matchmaking |
| Difficulty tiers | Adventure, Standard, Custom |
| Power handicap | All Guardians under-leveled, tier-scaled |
| Rewards | Pantheon armor, Tier 5 loot, possible Anarchy catalyst + Threat Level drops |
| Title progress | Godslayer (Pantheon Godsbane), MMXXVI seal |
| Prerequisite | Weapons of the Pantheon (Drifter quest) |
Use this as your at-a-glance reference before queuing. The capstone framing matters: this is a longer activity than Calus Resplendent or Morgeth Surpassing, with the same mechanic density carried over plus a new high-skill-floor boss fight tacked on the end.
No Matchmaking and Fireteam Requirements
Insurrection Prime Revolutionary is 6-player, no matchmaking. You bring five friends, you roll Fireteam Finder or LFG, or you buy a carry. Coordinated voice comms are non-negotiable from the first encounter onwards, and the Insurrection Prime fight specifically requires a dedicated map reader. A six-stack of strangers without mics will not finish this activity.
Important: Insurrection Prime Revolutionary is the longest and most mechanically dense activity in Pantheon 2.0. Plan the full fireteam before you launch. If you cannot field six on comms, our Destiny 2 Pantheon 2.0 carry drops you straight into a coordinated team, including Platinum runs on Custom.
Revive Economy and Time Expectations
Standard tier pools revives across the entire 7-encounter run. There is no checkpoint between bosses. If your team has been clearing Calus Resplendent and Morgeth Surpassing in under 35 minutes, expect Insurrection Prime Revolutionary to take noticeably longer because the Insurrection Prime fight itself is mechanically dense and rarely one-phased on Standard. Treat the first six encounters as a revive-discipline check. Arrive at Insurrection Prime with revives banked.
Rewards, Anarchy Catalyst and Title Progress
Each encounter inside the gauntlet drops the same loot as the standalone Calus Resplendent and Morgeth Surpassing runs. The Insurrection Prime final encounter adds its own loot pool plus the capstone vendor at the end of the run.
- Pantheon armor: activity-exclusive armor pieces drop from each encounter, including a unique set tied to the Insurrection Prime kill.
- Tier 5 loot: the final chest contributes Tier 5 weapons and armor on Custom tier and a weekly Adept on Standard.
- Possible exotic drops: community clears have documented the Anarchy catalyst and the Threat Level shotgun as possible drops from the final Insurrection Prime encounter, but verify the drop source in game before farming it as a guaranteed target. For the wider catalyst pool see our new catalysts guide .
- Final vendor chest: repurchase any weapons or armor you saw drop in the run using Spoils of Conquest.
- Title progress: every capstone clear feeds the Godslayer Title (also referred to as Pantheon Godsbane in some menus) and the MMXXVI seal.
Phase 1: Opening Berserker and Map Activation
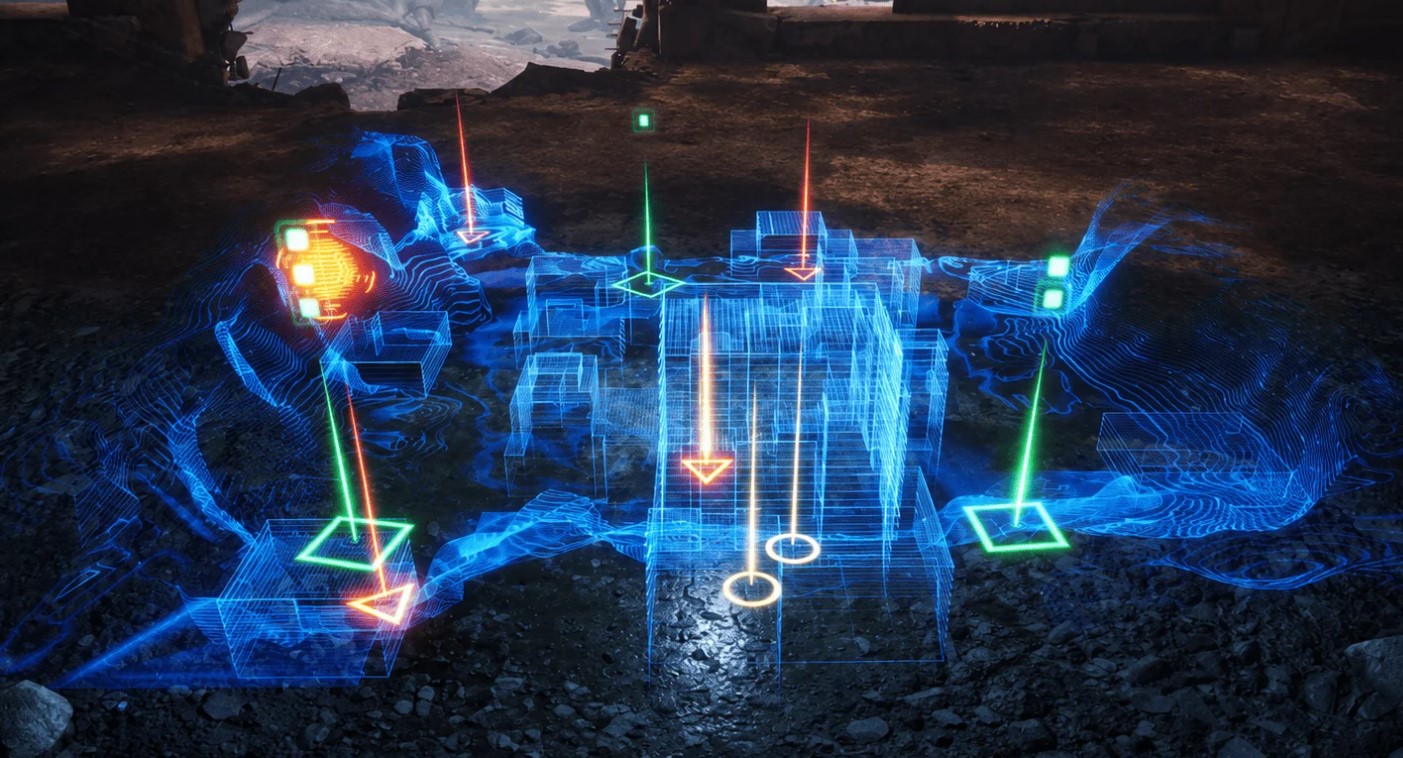
The boss fight opens in an open battlefield with several buildings, three battery deposit consoles arranged around the map and a rally flag near the central deposit. There is no separate setup phase: the moment you drop the first battery, the boss spawns. This is where most teams fumble because they treat the Berserker as a regular ad and then the boss is alive before half the team is in position.
Arena Layout
The arena has three deposit consoles at fixed positions, a rally flag where the holographic tactical map projects after the first dunk, and an underground facility entrance gated by an electric Servitor barrier. Memorise the three deposit numbers (back middle is 1, close right is 2, close left is 3 in the most common callout convention) before the boss spawns so the map reader can call dunks instantly.
Berserker Mechanic and First Battery
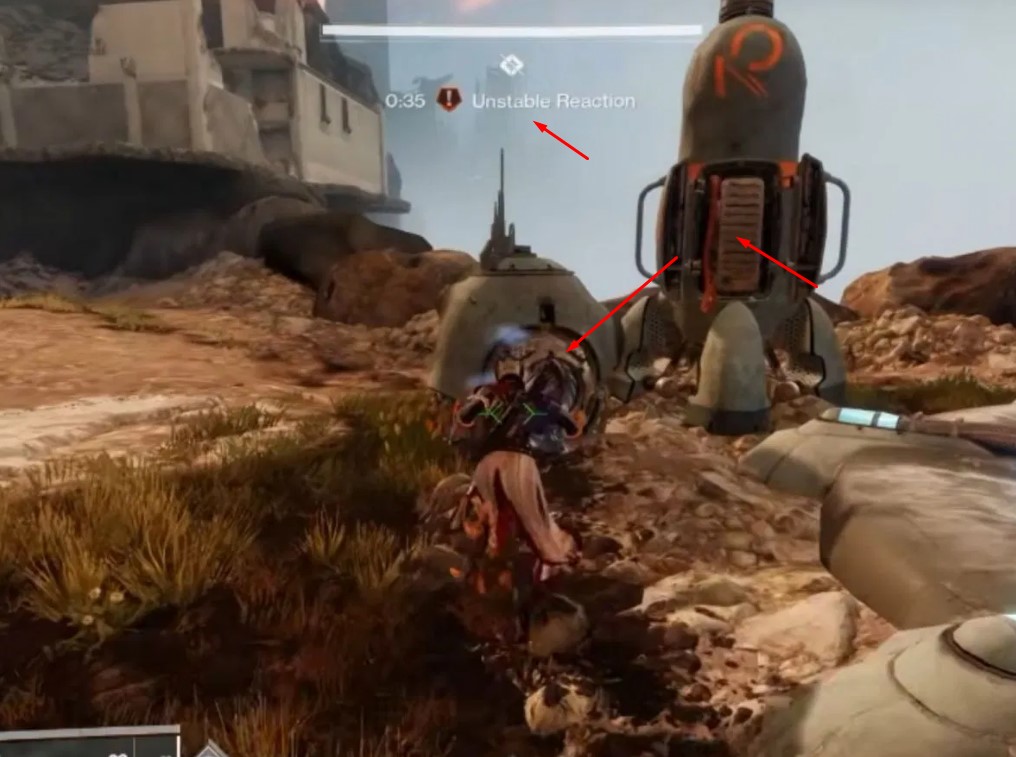
A Berserker spawns near the middle of the map. Two players approach. The Berserker deploys a blue slowing dome when you get close. One player shoots the orange weak point on the front pack, the other shoots the back weak point. Breaking both at the same time stuns the Berserker, after which the team finishes him off. The first Berserker drops a single Radiant Battery; subsequent Berserkers drop two batteries each.
The carrier brings the battery to any deposit. The deposit slot lights up, the holographic tactical map activates next to the rally flag, and the boss spawns. The carrier now has Ionized for around two minutes, a lockout debuff that prevents them from carrying or dunking another battery during that window. Rotate carriers so the team always has fresh hands.
Tactical Map and Ionized Lockout
The tactical map is the encounter's nerve center. It shows yellow circles for Guardian positions, red or orange triangles for Berserker spawn points, a glowing red ball on the currently active Berserker triangle, green squares for the three deposit consoles, and a small pip count above each Guardian's marker that tells the map reader which numbered deposit that carrier must use. Carriers pick up batteries one at a time so the map reader can identify each pip count individually. Two batteries grabbed at once breaks the read.
Pro Tip: assign the map reader before you ever start the encounter. This is the single most important role in the entire fight. A confident, calm caller turns the battery phase into a routine; a quiet caller turns it into a guessing game.
Phase 2: Underground CAP Buff Collection
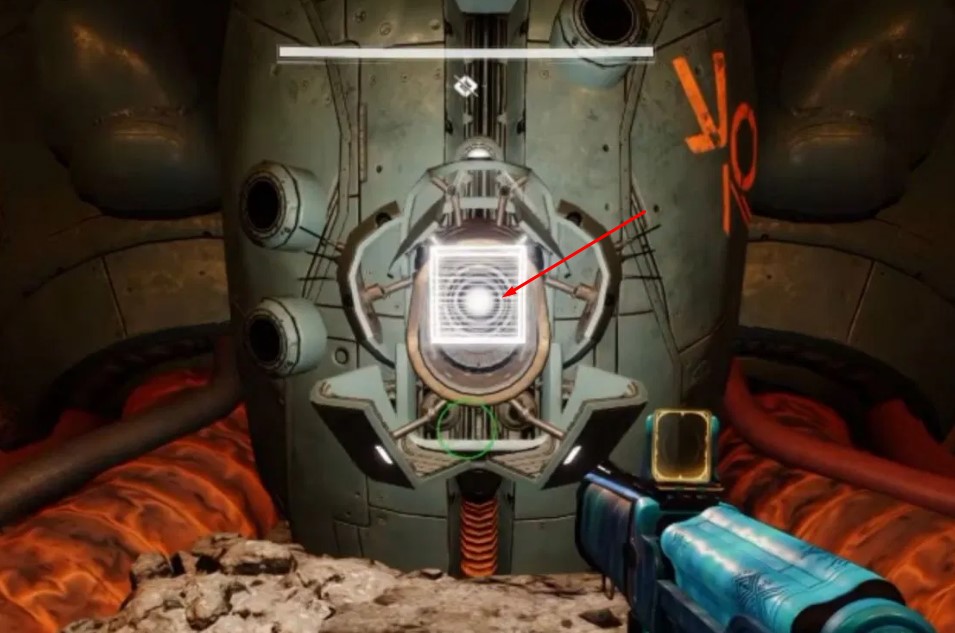
CAP is the highest-skill-floor mechanic in Pantheon 2.0. Three buffs, three positions, two players per buff, and a single wrong terminal punch wipes the team. The team splits into two trios that rotate underground in alternating cycles to collect Continuous, Angular and Parallel buffs.
Servitor Barrier and Team Rotation
The underground entrance is gated by an electric Servitor barrier on the surface. Killing the surface Servitor drops the barrier for a few seconds. Trio A descends during that window. Trio B holds surface and kills the next Servitor when Trio A is ready to come up; then Trio B descends and Trio A holds. Two full rotations cover all six players. End state: two players each on Continuous, two on Angular, two on Parallel.
The Four Terminals and the Wipe Terminal
The underground facility has four terminals arranged in a quadrant ring. Three are usable: Circle = Continuous, Triangle = Angular, Square = Parallel. The fourth terminal flashes red with a mixed-symbol icon. Punching the red terminal is an instant team wipe. Name-check the symbol before any melee. The whole trio should agree on which terminal each player punches before anyone steps forward.
Warning: never punch the flashing-red mixed-symbol terminal underground. Instant team wipe, no recovery. The four terminals are easy to misread under fire, so call out the symbol you are about to punch before you melee it.
Pro Tip: wait for all three trio members to be in position so all three terminals get punched within a short window. Punching individually before everyone is ready can reshuffle the symbols on subsequent Servitor kills and force a second trip down.
End State: 2 Players Each on C, A and P
After both rotations, the team has two Continuous, two Angular and two Parallel players. Same-buff pairs are the only safe pairings. Standing close to a teammate with a different CAP buff tethers both players with a damaging aura that can kill within seconds. The aura radius is larger than it looks. The pair assignment carries into Phase 3 (Berserker hunting) and Phase 5 (CAP triangle DPS), so lock who is paired with who from the moment you come up.
Phase 3: Battery Rotation Using the Tactical Map
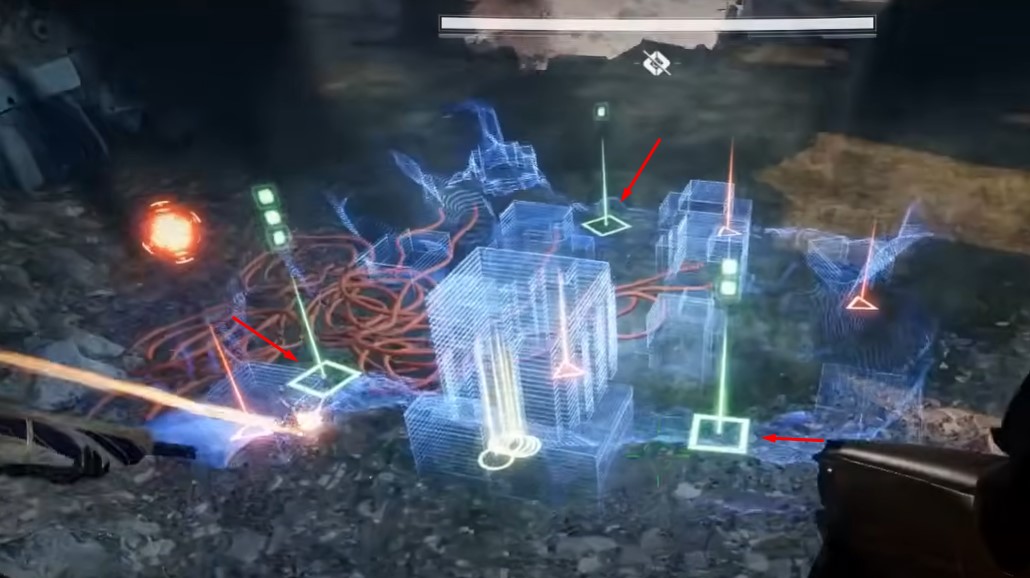
With CAP buffs collected and the map active, the team enters the battery rotation. This is where the encounter feels chaotic if you have not assigned a map reader. The map reader calls every Berserker spawn, every carrier pip count and every deposit number. Everyone else listens. The phase sequence cheat sheet below summarises the full encounter flow before we go deeper into the rotation itself.
| Phase | Mechanic | Output | Wipe Risk |
| Phase 1 | Berserker kill + first battery dunk | Boss spawns, tactical map activates | Boss spawn with team out of position |
| Phase 2 | Underground CAP collection (two trios rotate) | 2 players each on C, A and P | Red mixed-symbol terminal punch (instant wipe) |
| Phase 3 | Battery rotation with map reader + pip dunks | 4 batteries dunked, 3 Drake Tanks spawn | Wrong dunk forces extra Berserker cycle |
| Phase 4 | Break 6 white shield panels (knees, arms, back) | Shield down, ready for tank shot | Re-shooting a broken panel on Challenge feat |
| Phase 5 | Drake Tank stagger + CAP triangle DPS on Servitor | Damage window with Phase Synergy buff | Different-buff tether kills, missed pulse rotation |
Reference this table when you brief a new fireteam member. The five-phase rhythm is the spine of the encounter, and every wipe falls into one of the rightmost-column risks. If you can name the phase you wiped in, you already know what to fix.
Map Reader Role and Pip Callouts
The map reader stays at the rally flag for the whole encounter. Their job is to read the tactical map continuously and call three things on comms: the currently active Berserker location (the red triangle with the glowing ball above it), the pip count above each carrier (which numbered deposit they must use), and any second Berserker that spawns before the first is dead. A clean call sounds like: "Right Berserker, carrier on 2, second on 1." Carriers run to their assigned deposit and dunk; the map updates and the next Berserker spawns.
Same-Buff Berserker Pairs
Berserker kills require two players in melee range of each other. Send a matched-buff pair to every Berserker so they do not tether each other. A Continuous pair, an Angular pair or a Parallel pair are all safe; mixing buffs at the Berserker is a self-inflicted wipe. The map reader assigns pairs on the fly using the buff colors visible on the map.
4 Batteries to 3 Drake Tanks
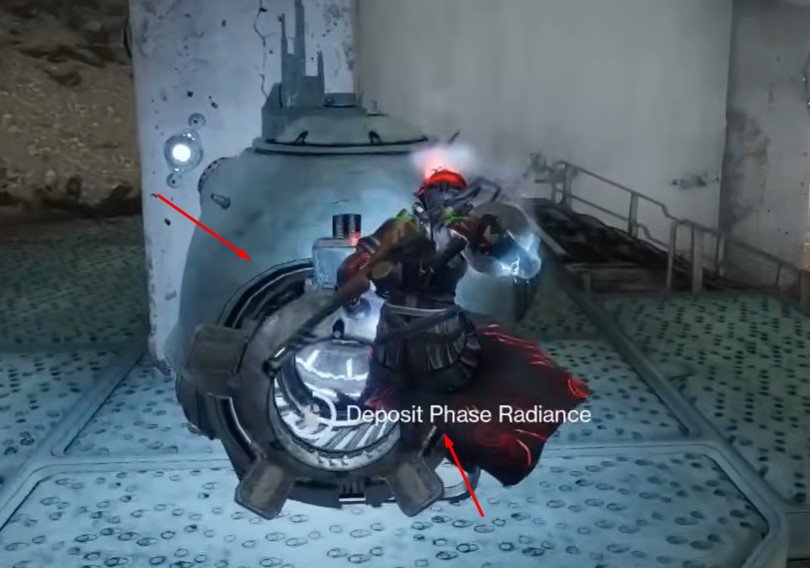
After four batteries have been deposited at the correct consoles, three Drake Tanks spawn next to the three deposit points. Wrong dunks do not count toward the four; a misread by the map reader forces an extra Berserker cycle. With four clean dunks the tanks are ready and the team transitions into the shield-panel and DPS phase. Optional during this phase: shoot the orange canister on the boss's back when he charges his air-missile attack, or his arm-cannon weak point during the ground beam attack, to stun him mid-attack.
Phases 4 and 5: Shield Panels, Drake Tank and CAP Damage
With the Drake Tanks parked next to the deposits, the team breaks six white shield panels on the boss, fires the Drake Tank to stagger him, opens his chest cavity to expose the internal Servitor, and then forms the CAP triangle for damage. This entire sequence has to happen in one go: shield panels first, tank shot second, CAP triangle third. If anyone is out of position when the tank fires, the damage window opens with the team scattered and Phase Synergy never lands.
Breaking the Six Shield Panels
Before DPS, the team breaks six white shield panels on the boss: two on the knees, two under the arms, two on the back. Sleeper Simulant one-shots panels; snipers take two to three shots depending on archetype; linears and Whisper work too. If you are running the Challenge feat, each player is restricted to breaking ONE panel per phase, so pre-assign zones (two players on knees, two on underarms, two on back) and stop shooting once your panel is broken.
Drake Tank Stagger and the Exposed Servitor
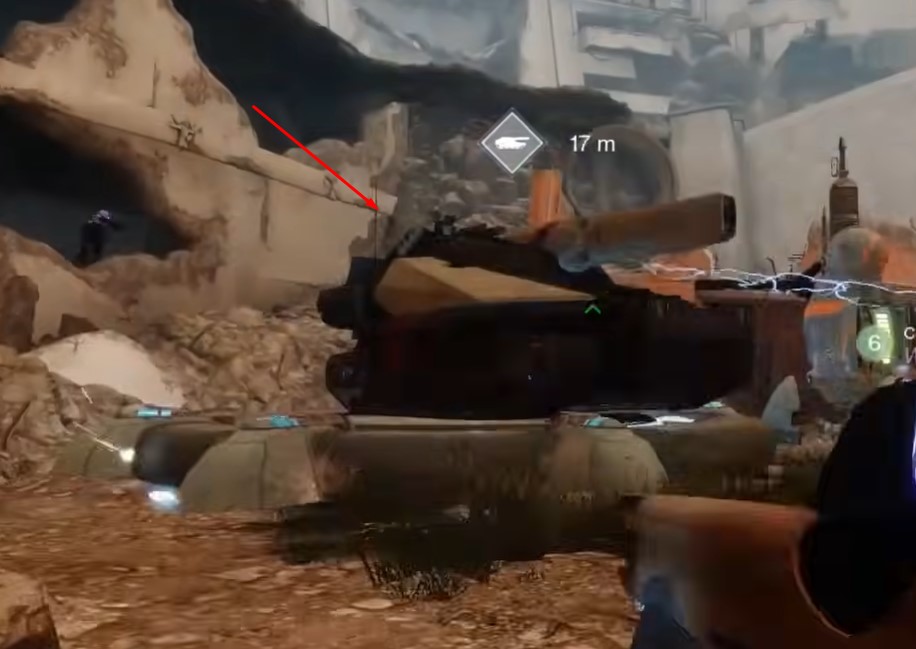
Three Drake Tanks spawn but only one is used to trigger the damage phase. Assign one designated Drake Tank pilot before the DPS phase opens. The other tanks are backups, not an excuse for three players to leave the CAP formation. The pilot jumps in, waits until the boss is facing an open area where the team can spread into the triangle, and fires. The tank shot staggers the boss, the chest cavity opens, and an internal Servitor is exposed inside the mech. The exposed Servitor is the real DPS target, not the armored mech body. Shooting the mech instead of the Servitor wastes the entire phase.
CAP Triangle Formation and Phase Synergy
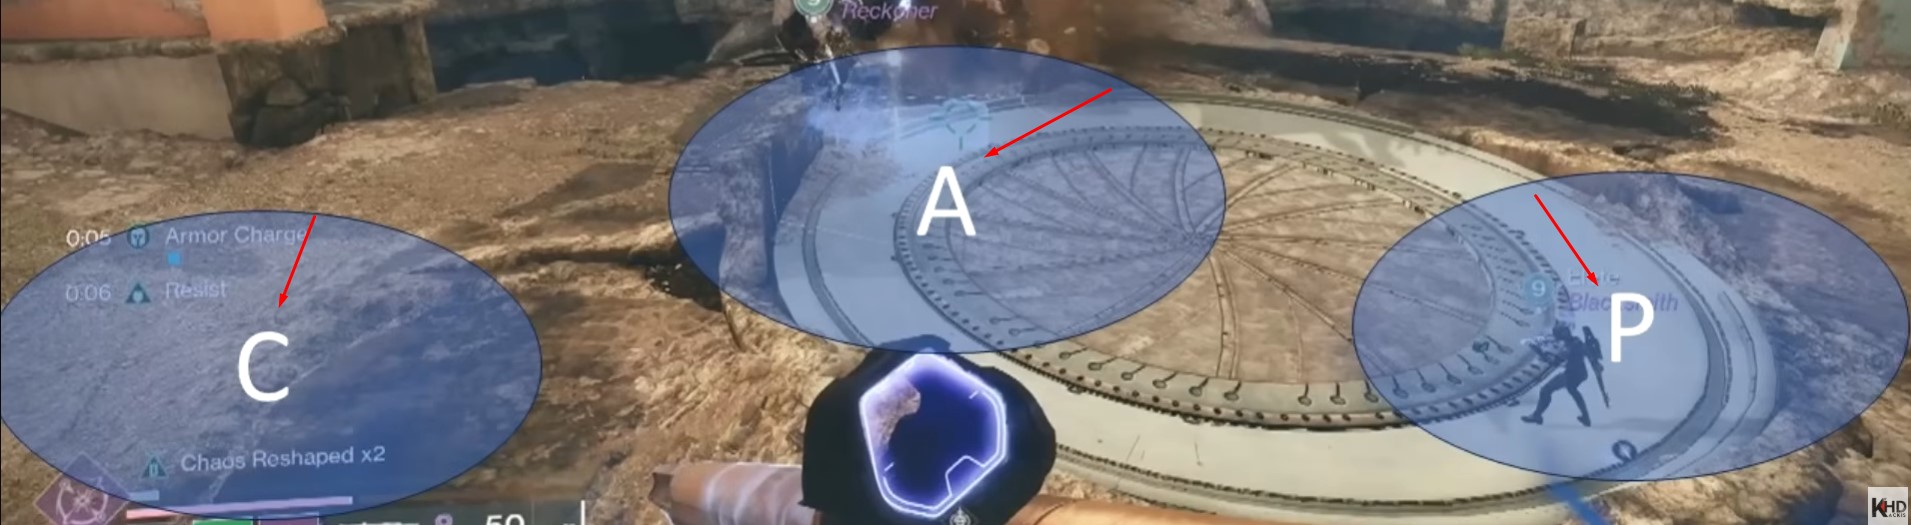
The instant the chest opens, the team forms an inverted triangle around the boss. Continuous pair stacks back-left, Angular pair stacks front (closest to the boss), Parallel pair stacks back-right. Same-buff players must stack together; different-buff players must stay separated to avoid tethering. The exact rotation direction can vary by team, but everyone must agree on one CAP layout before the Drake Tank shot starts.
| Buff | Symbol | Triangle Position | Partner Rule |
| Continuous (C) | Circle | Back-left | Stack only with the other C player |
| Angular (A) | Triangle | Front, closest to boss | Stack only with the other A player |
| Parallel (P) | Square | Back-right | Stack only with the other P player |
The exact layout can vary by team, but everyone must agree on one CAP layout before the Drake Tank shot starts. When properly paired and not in range of a different-buff teammate, the HUD shows a Phase Synergy buff on the left side of the screen. This is the massive damage multiplier that makes the DPS window viable. Without Phase Synergy, your shots tickle the Servitor and the damage phase ends with the boss barely scratched.
Warning: same-buff pairs only stand close. Touching a different-buffed teammate triggers a tether aura that can kill both players in seconds. The radius is bigger than it looks. Use map markers or Wells to mark the triangle stack points so nobody drifts.
The Pulse Buff-Swap Reaction
The boss emits a pulse up to twice per damage phase. The pulse may swap the CAP buffs on some or all players. If your buff changes from Continuous to Parallel, you immediately drift toward the back-right stack to rejoin your new partner. Treat every pulse as if it WILL swap buffs and rotate position accordingly. The cost of a wrong rotation is one teammate dying to the tether; the cost of a missed rotation is the same plus a lost damage phase.
Cheese Method: Titan Ward of Dawn and Heavy Combat Bow
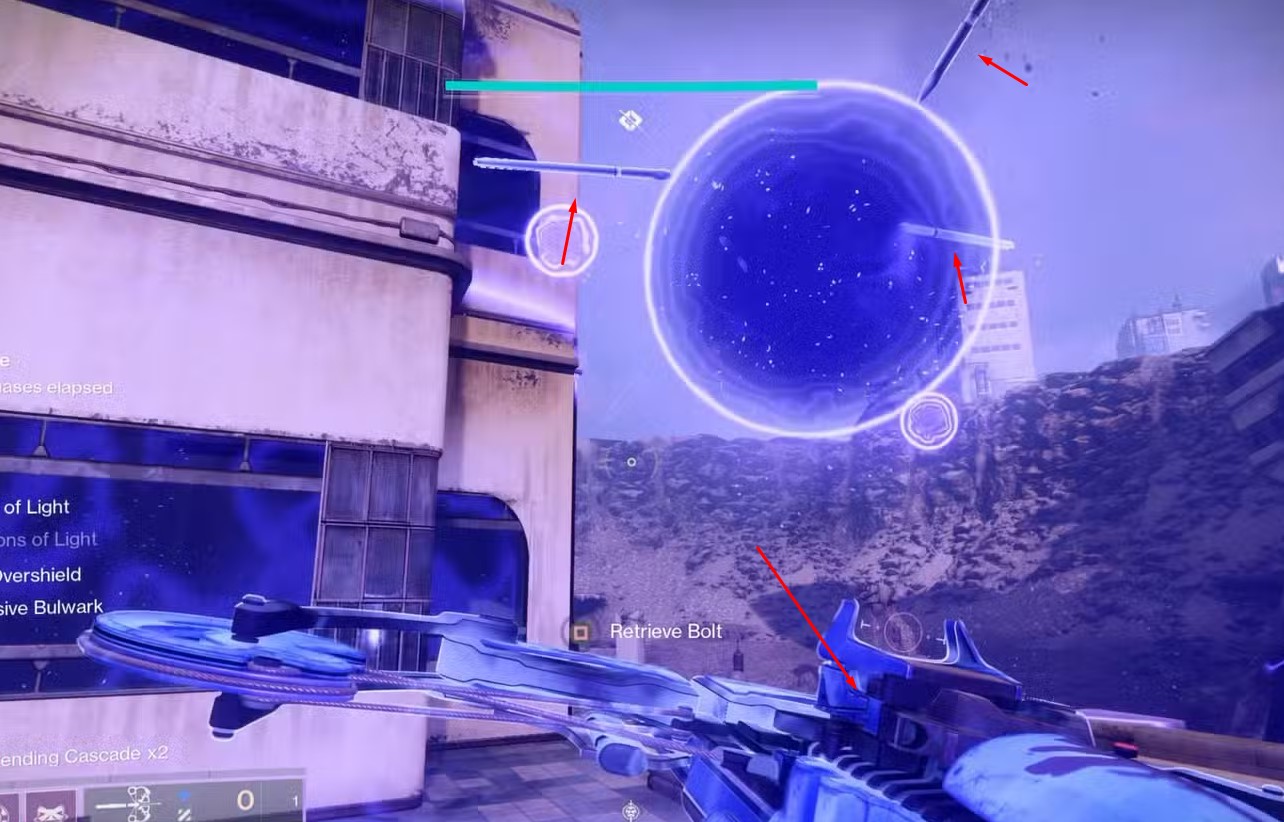
A community-discovered cheese exists for Insurrection Prime that uses a Titan Ward of Dawn and a Heavy Combat Bow to launch the boss into a kill barrier above the arena. The cheese is real, it is documented at length, and a small number of teams have used it for fast clears. This section walks through the setup, but the framing matters: this is a temporary exploit, not the intended way to clear the encounter.
Currently Working, Likely to Be Patched
As of mid-June 2026, the cheese is reported working on Adventure and Standard tiers. The community source explicitly describes the cheese as "extremely difficult and more luck-based" than other Pantheon cheese routes. It is harder to execute than a clean legit clear with a coordinated team and any patch cycle is likely to close the exploit. Do not plan farming runs around this cheese. Treat it as a one-off attempt for the curiosity Triumph, not as the main strategy for the weekly Adept or Custom Platinum push.
Step-by-Step Cheese Setup
The cheese requires a single Titan running Void subclass with Ward of Dawn Super and a Heavy Combat Bow equipped in the heavy slot. The other five players hold the room and bait the boss into the cheese position.
- Position the Titan: the Titan moves to the rooftop of the yellow building on the right side of the arena.
- Drop Ward of Dawn: pop the Bubble on the rooftop facing the inside of the arena.
- Bow the top of the Bubble: fire five bolts from the Heavy Combat Bow into the top of the Bubble. The bolts stay there as collision geometry.
- Bait the boss: wait for Insurrection Prime to walk between the green and yellow buildings. Push him toward the EDGE of the green building.
- Jump-melee at the corner: jump into the boss's lower body and melee. The bolt-collision geometry combines with the melee push to launch him skyward off the corner.
- Wait for the kill barrier: if the launch goes high enough, the boss exits his teleport leash range. The arena's upper kill barrier drains his HP. Enemies despawn, the chest spawns.
The exact bolt geometry, jump timing and boss positioning are finicky. Expect multiple attempts before the launch lands cleanly.
Why Most Teams Should Still Learn the Fight
The cheese is harder than a clean legit clear with a coordinated 6-stack. A team that knows the CAP formation, the map reader role and the shield-panel split will clear Insurrection Prime in fewer attempts and with more consistency than a team chasing the launch geometry. The cheese is also a single Bungie patch away from disappearing entirely, while the legit mechanics remain stable for the rest of Pantheon 2.0's life cycle. Learn the fight first. Use the cheese as a one-off curiosity attempt, not as your weekly farm.

Best Loadouts and Role Assignments
With the CAP mechanic and map reader role nailed down, loadout choice is the next biggest factor in a clean Insurrection Prime clear. These are strong launch options with the post-9.7.0 buffs applied, not a permanent meta. Patch balance shifts; check Bungie patch notes before committing if it has been a couple of months since launch.
Heavy DPS Picks
Strong launch options for heavy include Queenbreaker (the catalyst is essential and the weapon is viable against every Pantheon boss), Sleeper Simulant for one-shotting shield panels plus damage phase contribution, Whisper of the Worm for sustained crits on the exposed Servitor, and high-tier legendary linear fusion rifles that benefit from the current Particle Deconstruction artifact mod. For catalyst upgrades, see our new catalysts guide .
Support Roles and Map Reader
Two support roles are mandatory. Well of Radiance Warlock for survival during the CAP triangle DPS window. Banner Shield Titan with Doom Fang Pauldrons as a DPS amp. A third Warlock running Speaker's Sight for healing turret coverage helps when the team is split between underground rotations and surface Berserker hunts.
The map reader is a dedicated role, not a rotating job. Pick the player with the calmest comms voice and the cleanest add-clear primary; they will stay at the rally flag the whole encounter, calling Berserker spawns and pip-count deposits. A single confident map reader makes the encounter feel routine. A quiet or panicked map reader turns every Berserker into a guessing game.
| Role | Heavy | Special | Primary | Super |
| Map Reader | Heavy LFR | Sniper | Auto with Heal Clip | Well of Radiance, Banner Shield |
| Berserker Pair | Sleeper Simulant | Heavy sniper | Fast-TTK primary | Burst supers for Berserker stun |
| Drake Tank Pilot | Queenbreaker or Whisper | Heavy sniper | Auto with Heal Clip | Nighthawk Golden Gun, Cuirass Thundercrash |
| CAP Triangle DPS | Queenbreaker, Whisper, Sleeper | Heavy sniper | Auto with Heal Clip | Burst supers, Banner Shield |
Use this table as a starting point. The biggest swap is the Drake Tank pilot: only one tank shot triggers the phase, so the designated pilot needs a clean line of sight while the rest of the team is already in CAP position. The biggest mistake is having every player roll a "Berserker killer" loadout and nobody owning the map reader role.
Pre-Fight Checklist
- Map reader assigned by name before launch.
- Drake Tank pilot assigned by name for the first damage phase.
- CAP layout agreed on (Continuous back-left, Angular front, Parallel back-right is the most common).
- Underground rotation order set (Trio A first, Trio B second, or whatever your team prefers — just lock it).
- Shield panel zones split (2 knees, 2 underarms, 2 back) if running the Challenge feat.
- Heavy weapons Surge-matched to the weekly elemental Surge if possible.
- Everyone knows the red terminal is a wipe.
Run this checklist out loud at the rally flag, even on weekly farms. A 30-second pre-launch confirmation saves 5 to 10 minutes of mid-run wipe recovery. The wipe-cause table below covers the most common failure points so you can name the fix the moment a phase ends in disaster.
| Phase | Wipe Cause | Fix |
| Phase 2 | Red mixed-symbol terminal punched | Call out the symbol before any melee on the four terminals |
| Phase 2 | Trio punches before everyone is ready | Wait until all three are in position, then punch within a few seconds |
| Phase 3 | Map reader miscalls a dunk | Pick up batteries one at a time so each pip count reads cleanly |
| Phase 3 | Different-buff Berserker pair tethers | Send a matched-buff pair to every Berserker |
| Phase 4 | Re-shooting a broken panel on Challenge feat | Pre-assign 2 players per zone (knees, arms, back); stop after one panel |
| Phase 5 | Drake Tank pilot fires with boss facing the wrong way | Wait until the team can spread into the CAP triangle |
| Phase 5 | Team shoots the mech body instead of the exposed Servitor | Open chest reveals the internal Servitor; that is the DPS target |
| Phase 5 | Different-buff teammate drifts close, tether kills both | Same-buff pairs only stack; mark positions with Wells if needed |
| Phase 5 | Missed pulse buff-swap rotation | Treat every pulse as a swap and rotate immediately |
Print this table mentally before your first Standard clear. The nine wipes above cover the vast majority of Insurrection Prime failures. If you can cover every row on comms, the run lands cleanly even on rough nights.
When your LFG group keeps falling apart on the CAP formation or you need a guaranteed Platinum clear on Custom, a Pantheon 2.0 carry drops you into a coordinated team that has cleared Insurrection Prime dozens of times across Standard and Custom tiers. Useful for the weekly Adept farm, MMXXVI seal progress and the Godslayer Title push.

Insurrection Prime FAQ
Can Insurrection Prime Revolutionary be soloed?
No. The activity is locked to six players with no fewer-player override. The CAP mechanic requires two players per buff (3 pairs), the underground requires alternating trios, and the boss fight has too many parallel mechanics for one player to cover. The cheese method is the closest you will get to a low-man clear, but even that requires a full team to bait the boss into position.
Is there matchmaking?
No matchmaking on any tier. You bring a fireteam, use Fireteam Finder or LFG, or buy a carry. Adventure tier still requires a full pre-formed team of six.
Does the cheese still work?
The Titan Ward of Dawn cheese was reported working at mid-June 2026 on Adventure and Standard tiers. Bungie is expected to patch it. Before attempting, confirm the cheese is still functional via current community footage. Do not plan a farm strategy around the cheese.
How long does the full activity take?
Plan for a noticeably longer run than Calus Resplendent or Morgeth Surpassing because the gauntlet stacks 7 encounters in one session and the Insurrection Prime fight itself is mechanically dense. Coordinated 6-stacks land Standard clears in the same general window as the other capstone-style activities; first clears almost always take longer due to the CAP learning curve.
Can I farm Anarchy catalyst here?
Community clears have documented the Anarchy catalyst and the Threat Level shotgun as possible drops from this final encounter, but verify the drop source in game before farming. The wider catalyst pool is covered in our new catalysts guide .
Does Insurrection Prime have a final stand?
No final stand. Insurrection Prime dies cleanly at 0 HP and the encounter ends. Plan your damage phases around the standard CAP triangle plus shield-panel break cycle; do not save heavy or supers for a phase that never arrives.
What is the wipe risk during the underground phase?
The flashing-red mixed-symbol terminal is an instant wipe if punched. Beyond that, the underground itself is safe as long as the team punches the three correct symbols (Circle, Triangle, Square) and the surface team kills the next Servitor on time so the descending trio can come up cleanly.
Final Thoughts and Carry Recommendations
Insurrection Prime rewards role discipline more than raw mechanics knowledge. Lock the map reader by name. Lock the Drake Tank pilot. Lock the CAP layout. Memorise the three deposit numbers. Bring Queenbreaker or Whisper, Well or Banner, and you will clear Standard on most weekly runs. The decision logic is simple: Adventure for the first learning run with the CAP formation, Standard for the weekly Adept farm, Custom only when your fireteam knows the CAP triangle and the map reading cold and is chasing Platinum.
For the wider Pantheon 2.0 context, sit this capstone next to the two launch blocks. Read the Pantheon 2.0 overview for the full schedule, the Calus Resplendent guide for Argos, Gahlran and Calus, the Morgeth Surpassing guide for Warpriest, Consecrated Mind and Morgeth, and the Monument of Triumph guide for patch context.
If your LFG luck is rough this week, you cannot field six on comms, or you want to lock in the weekly Adept and the Platinum emblem in one session, a Destiny 2 Pantheon 2.0 carry drops you into a fireteam that has cleared Insurrection Prime dozens of times across Standard and Custom tiers. Same week, same loot, no scheduling headaches.